How to Set Up Brand Fonts in Google Docs
How many times have you created a Google Doc, only to wish that you could make them match your business branding without giving you a headache? This is especially true if you have to send or share something to a client. You wish that you could use your brand colors and fonts easily, without having to figure out new creative software.
WHAT IF I TOLD YOU IT'S GOING TO TAKE YOU LESS THAN 5 MINUTES TO SET UP YOUR BRANDED FONTS AND FONT COLORS IN GOOGLE DOCS?
I'm serious! Once you follow these easy steps you'll have them saved as your default font styles, ready to use on any document you create.
Ready?
Here are 5 easy steps to set up your own default font styles in Google Docs.
STEP 1:
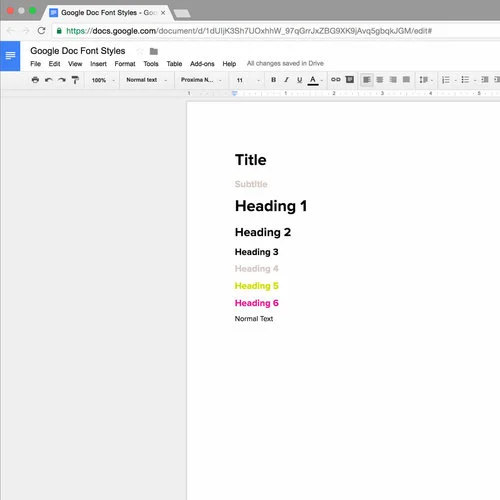
In a new document set up a list for your Title, Subtitle, Headings 1-6*, and your normal body text. When you have your list, select your brand fonts and colors for each item.
STEP 2:
Next to the font selector you will find the default style selector. Click it and you'll see a list of all the elements you just styled.
STEP 3:
Highlight "Title" in your document, open the style selector, hover over the coordinating element and click the arrow next to it.
STEP 4
After you click the arrow you will be given two options. Select "Update 'Title' to match.
Congratulations! You just set your first branded document style.
Repeat for each element.
STEP 5:
Once all of your font styles have been set, go down to options and "Save as default styles."
TA-DA!
Now your branded font styles will be available to use for any new document you create. Plus you can update previous documents with these settings too.
*When you start a new doc, your Header styles for Header 4-6 will not show up right away. You have to use Header 3 for Header 4 to show up (and so on). But rest assured, all the styles you saved as your default will be there to use.


